
This article provides a brief outline as to the need for and process of a knee replacement, and provides 10 exercises you should perform consistently (I recommend twice, daily!) to help you improve your strength before a knee replacement.
If you are scheduled to have a knee replacement or are considering having one, hopefully your doctor discussed with you the importance of increasing your strength before surgery.
It is possible (sadly) that no one has explained to you why it’s important to increase strength prior to surgery. Also, you may not even know what to expect in terms of what is actually being replaced and why.
Hopefully, this article will help answer some of your questions, and guide you through important exercises to do before a knee replacement.
Why Does Someone Need a Knee Replacement?

Over time (usually many years), damage to the knee can lead to severe pain (even while resting) and decreased function.
Osteoarthritis (OA) is the most common reason someone needs a knee replacement (See my article “Is Exercise Helpful or Harmful for Arthritis” for an understanding of what OA can do to joints. https://theseniorcenteredpt.com/is-exercise-helpful-or-harmful-for-arthritis/).
Other potential causes include:
*Rheumatoid arthritis
* Gout
*Disorders that cause excessive bone growth
*Blood supply issues, which cause bone tissue in the knee to die
*Knee injury
*Deformity causing loss of cartilage and pain1
A knee replacement is usually recommended after things like steroid injections and seeing a physical therapist haven’t reduced the pain.
This doesn’t mean that seeing a physical therapist before and after surgery isn’t important or effective! In fact, it’s very, very important to do so (if you ask me). It just means that the joint needs to be replaced in order for your therapy program to have the most impact.1
What is Actually Being Replaced?
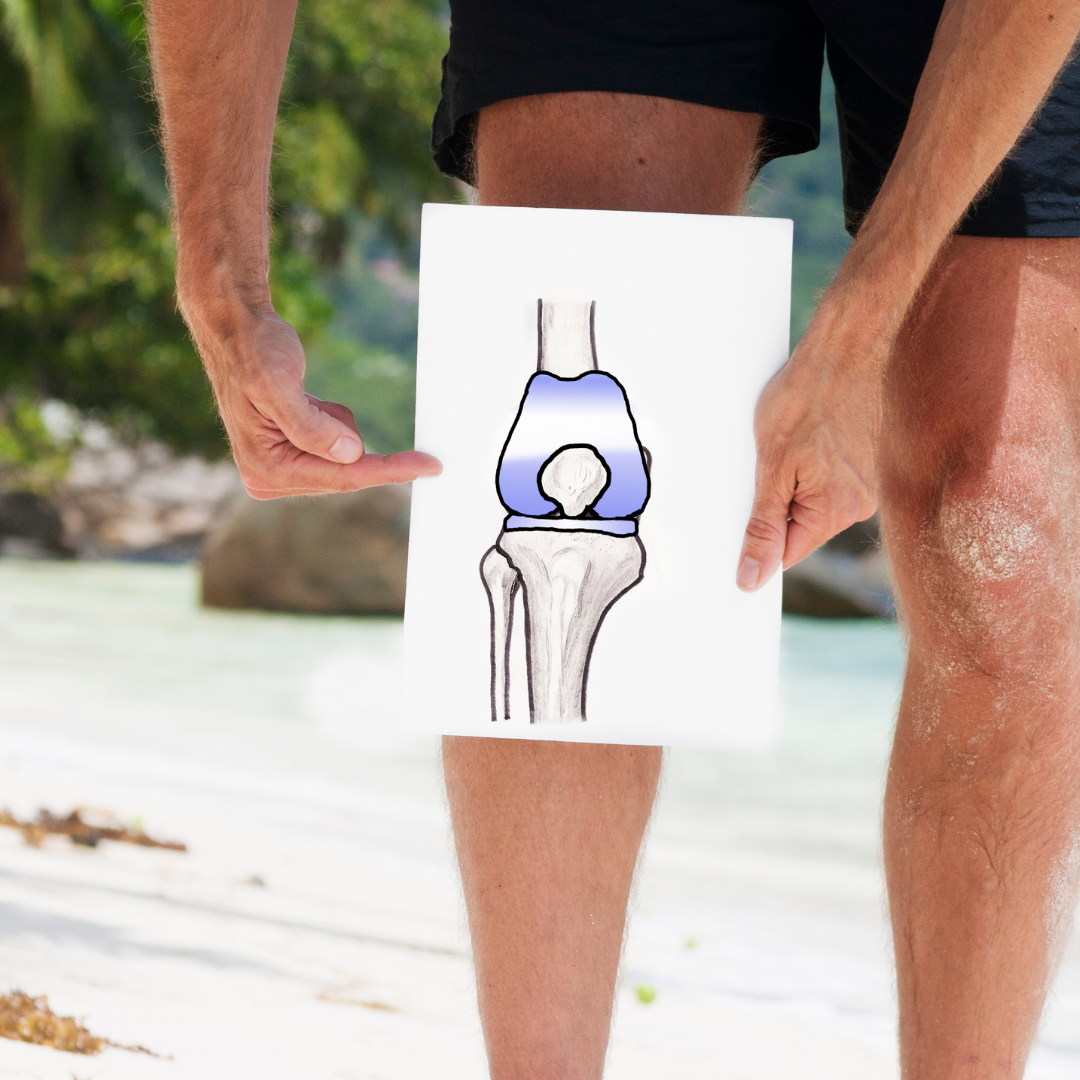
Let’s first look at the bones that make up the knee. These include the femur (thigh bone), the tibia (shin bone), and patella (knee cap).

Cartilage covers the bottom of our femur, the top of the tibia, and the back of the patella, which allow the joint to glide smoothly.
Damaged cartilage cannot regrow, and when the joint lacks the smooth padding the cartilage provides, pain and dysfunction occur.
In a total knee replacement, which is also called a “total knee arthroplasty” or TKA, the surgeon removes the damaged cartilage from the femur in tibia.
After it is removed, a manmade joint (usually made of metal or ceramic) with a plastic spacer is put in. The surgeon secures the new joint with screws and/or special cement.
The patella is later put on with bone cement. Sometimes a manmade patella is used as well. You can ask your surgeon what is being done on your knee.2,5
This new joint now allows the knee to glide smoothly again.

What’s a Partial Knee Replacement?

In the total replacement, the surgeon removes cartilage from both sides of the knee. You may hear your doctor or PT say the “lateral and medial” sides of the knee.
The medial side of your knee is on the same side as your big toe, and the lateral side of your knee is on the same side as your pinky toe.
In a partial knee replacement, it’s usually one side (lateral or medial) that needs to be replaced. Sometimes it’s the knee cap that needs to be replaced in a partial replacement.1
What is Recovery Like?

You’ll likely stay in the hospital for a few days after surgery.
It’s possible that your surgeon will prescribe a continuous passive motion (CPM) machine. A physical therapist will adjust it for your leg, and set the proper movement parameters for you. This machine with bend and straighten your leg for you.
This machine is truly doctor-dependent. Some surgeons don’t find it to be beneficial and some do. If you don’t get one, don’t worry.
Whether you have a CPM machine or not, a PT will come help you get out of bed, teach you exercises to do, and show you how to use an assistive device (walker or crutches).
You will likely have what’s called “weight bearing precautions” or a “weight bearing status”. Usually after a TKA or partial knee replacement you will hear your therapist say, “You’re weight bearing as tolerated.” Or you may see “WBAT” written on a board in your hospital room.
Weight bearing as tolerated means that you’re encouraged to put as much weight as possible on your surgical leg. Although it will likely be uncomfortable, this will really help the healing process.1,3
You will likely (and should) see a physical therapist for two months following surgery. Your therapist will really be able to help you increase strength to fully recover, but the most important thing to do is be consistent with your home exercise program.
A TKA is a major surgery, and full recovery does take a while.
It’s estimated that complete recovery, including scar tissue healing and full muscle recovery can take up to 2 years.
Please don’t let that discourage you!
Two years is a complete recovery timeline, but you’ll be able to be functional way before that, and you’ll likely feel better than before your surgery before the two year mark as well.
Here’s a general recover timeline for certain tasks (as always ask your surgeon and PT before performing activities):
Household chores: 3-6 weeks
Sex: 4-6 weeks
Work: 6-8 weeks
Swimming: 6-8 weeks
Driving: 6-8 weeks (if right knee was replaced. May be more like 1 week if left knee was replaced)4
Typically, tissue healing time is 6-8 weeks, so you’re likely to be feeling much better in that time frame.
**Something to Keep in Mind: Straightening (AKA “extension”) your knee is the most important thing you need to be able to do!
It’s very important to bend and straighten the knee, but if you don’t regain full extension, then you won’t be able to walk properly.**
If I’m Already Planning on Having a Knee Replacement, Why Do I Need to Get Stronger Now?

After surgery, you will likely have to do things a little differently than you did before (due to pain or decreased functional capacity of your knee).
That means you’re likely going to need to use muscles that you didn’t previously use and/or rely on.
Having adequate strength in your whole body, including the muscles surrounding your knee, will help reduce the time required for recovery.1
Additionally, many of the exercises that are recommended for prior to surgery will be done after surgery, so you and your body will have a much better idea of what you can expect when you see your physical therapist.
10 Exercises to Do Before a Knee Replacement
Check out this video of all of the exercises:
1. Heel Raises

This exercise works the lower leg, which is commonly called “the calf” muscles. The anatomical name for it is the gastrocnemius. This muscle is important for walking speed.
1. Stand with feet hip distance apart.
2. Hold on to a chair or stable surface for balance, if needed.
3. Lift heels off of the floor by pushing through the ball of your foot (make sure your weight is toward your first and second toe, not toward the pinky toe).
4. Slowly lower your heels back down.
5. Repeat 10-15 times.
6. Rest for 1-3 minutes.
7. Perform 3 sets total.
**Note: You can makes this more challenging by doing one leg at a time**
2. Squats


Squats work the muscles surrounding the front of the knee, the quadriceps muscles. Additionally, the hamstrings, abdominals, gluteal muscles, and calves are strengthened as well.
This may be an exercise that causes discomfort. Only squat as low as you are able, and have a stable surface nearby to hold on to, if necessary.
1. Stand with feet slightly wider than shoulders.
2. Brace your belly, so your abdominals are engaged. (Pretend you were going to lift something heavy- that’s the feeling you want in your abdominal region).
3. Push hips back as if you were going to sit in a chair.
4. Bend knees (keeping torso upright).
5. Squeeze the front of your legs and your buttocks to stand up.
6. Repeat 10-12 times.
7. Rest for 1-3 minutes.
8. Perform 3 sets total.
3. Chair Pushups

This exercise really works our triceps, which are going to be very important for helping you to get out of band and get up from a chair.
1. Use a stable chair with armrests.
2. Place the back of the chair against a wall so it doesn’t move.
3. Sit towards the front of the chair.
4. Place hands on arm rests (your elbows should be bent, so they’re not touching the armrests, and hands should be slightly in front of your shoulders).
5. Push through your hands to lift your bottom off of the seat.
6. Slowly lower bottom back into the seat.
7. Repeat 10-12 times.
8. Rest for 1-3 minutes.
9. Perform 3 sets.
4. Bent Knee Stretch

This stretch is helping stretch the muscles in the front of the thigh, surrounding the knee, the quadriceps.
Performing stretches of the front and back of the knee help decrease stiffness and improve range of motion.
1. Sit towards the front of your chair (using the same chair in exercise 3 with back of chair against the wall).
2. Place feet flat on the floor about hip distance apart.
3. Slide injured foot backwards, towards seat of the chair. It’s okay if your heel lifts.
4. You should feel a stretch on the front of your leg, around your knee. Hold stretch for 30 seconds.
5. Slowly bring your foot back to starting position.
6. Rest for 1-3 minutes.
7. Repeat three times (you can perform on each side to help flexibility in both legs).
5. Straight Knee Stretch

This exercise will stretch the back of the thigh, the hamstrings.
Once again, this will help improve range of motion at the knee.
You will need either two chairs, or a chair to sit in and something, like a coffee table, that you can put your foot on with your knee fully straight.
1. Place a chair in front of the chair or surface you are sitting on, or sit in front of a coffee table/surface you can put your foot on.
2. Place injured leg on chair/table/surface in front of you, so your leg is as straight as possible (Back your chair up if you need to in order to straighten leg).
3. You should feel a stretch on the back side of your leg. Hold it for 30 seconds.
4. Bring foot to the floor to rest for 1-3 minutes.
5. Repeat 3 times (perform on both sides).
**Note: You can get a deeper stretch by placing a rolled towel under your heel, or by pressing your thigh down into your chair.**
6. Hamstring Curls

As the name implies, this exercise works your hamstrings, or the muscles found on the back of the thigh.
These muscles really don’t get worked enough, and they are very important to walking.
You’ll need a chair, a resistance band, a doorway with a door (or a stable surface you can tie your band around).
1. Fold your resistance band in half and tie a knot towards the ends, or tie your resistance band around the leg of stable table/surface.
2. If you’re using a doorway, place the knot in the doorway, and close the door.
3. Sit towards the front of your chair and place one foot in the band, letting it wrap around the back of your ankle.
4. Straighten your knee (as much as you can keeping the band around your ankle, then bend your knee, pulling the band back towards the chair (If it’s too easy, scoot your chair back to add more resistance).
5. Repeat 10-12 times.
6. Switch legs, and perform steps 3-5 on this side.
7. Perform 3 sets on each side.
7. Heel Slides

This exercise helps improve range of motion in the knee, by stretching and strengthening the quadriceps and the hamstrings.
You will likely start doing this exercise right after surgery, so make sure you focus on bending as much as you can and straightening as much as you can.
These can be done fully laying down or seated on a bed or mat table with your legs straight out in front of you.
1. Bend your non-injured leg, and straighten your injured leg.
2. Bend your injured knee as much as you can by sliding your heel towards your bottom.
3. Hold for 3 seconds at your maximum amount of bend.
4. Slowly return your foot to starting position, squeezing the front of your thigh to get your leg as straight as you can.
5. Repeat 15 times.
6. Perform on the other leg.
7. Perform 3 sets on each leg.
8. Bed Mobility


This exercise is very functional, and so important that you practice daily! After surgery, you may not be able to/want to get out of bed the way you did before surgery, so making sure you have enough range of motion and strength in your upper body is essential!
This exercise is, once again, working the triceps, as well as muscles of the shoulder, and abdominals.
1. Lay flat on your back with arms by your sides.
2. Bend your elbows so your hands come towards your chest.
3. Push up through your elbows to lift shoulder blades off of the bed.
4. Push through your hands to lift torso up from the bed.
5. Slowly lower your torso back down to the bed.
6. Repeat 10 times.
7. Rest for 1-3 minutes.
8. Perform 3 sets.
9. Straight Leg Raises

This is another exercise you will perform following surgery, but will likely be a little later in your recovery.
Doing this now, correctly, will help prepare your body for when you need to do it later.
This exercise will help strengthen the quadriceps.
1. Lay flat on your back with legs straight.
2. Bend non-injured knee so your foot is flat on the bed/mat.
3. Squeeze the quad/front thigh of the injured leg.
4. Lift injured leg (with quad still activated) up- no higher than knee of opposite leg.
**Note: leg MUST be straight! If you cannot keep your knee from bending, please skip this exercise.**
5. Lower leg back down to bed/mat slowly.
6. Relax quad muscles.
7. Repeat steps 3-5 for 10-12 repetitions.
8. Perform on other leg.
9. Perform 3 sets on each leg.
10. Side lying Abduction


None of us strengthen our hips enough! What’s interesting, though, is that our hip strength impacts not only our hips, but our knees and back as well.
The stronger your hips, the less likely you are to have pain in any of those regions!
This exercise primarily works the gluteus medius with some work done by the tensor fasciae latae.
1. Lay on your non-injured side.
2. Bend your bottom knee.
3. Lift your top leg about 6 inches off of the floor/mat/bed (focus on lifting from your glutes. You should feel your glutes working!).
4. Lower your leg to starting position.
5. Repeat 10-12 times.
6. Rest for 1-3 minutes.
7. Perform 3 sets.
8. Repeat on other side.
Have the Strength to Live Life to the Fullest!
Sources:
- Knee replacement – NHS. (2019). Retrieved 21 January 2021, from https://www.nhs.uk/conditions/knee-replacement/#:~:text=Knee%20replacement%20surgery%20is%20usually,rheumatoid%20arthritis
- A Visual Guide to Knee Replacement. (2019). Retrieved 21 January 2021, from https://www.webmd.com/osteoarthritis/ss/slideshow-knee-replacement#:~:text=Knee%20replacement%20usually%20takes%201,the%20new%20joint%20move%20smoothly.
- Retrieved 21 January 2021, from https://www.uwhealth.org/files/uwhealth/docs/sportsmed/RE-38789-14_TKA_OP.pdf
- A Visual Guide to Knee Replacement. Retrieved 21 January 2021, from https://www.webmd.com/osteoarthritis/ss/slideshow-knee-replacement#:~:text=Knee%20replacement%20usually%20takes%201,the%20new%20joint%20move%20smoothly.
- Knee joint replacement: MedlinePlus Medical Encyclopedia. Retrieved 21 January 2021, from https://medlineplus.gov/ency/article/002974.htm#:~:text=After%20you%20receive%20anesthesia%2C%20your,to%20fit%20the%20replacement%20part.
